Whether you’re a seasoned professional or a homeowner eager to enhance your living space, installing a Korniche Roof Lantern can be a game-changer for your home’s aesthetic and energy efficiency. These high-quality roof lanterns not only flood your interiors with natural light but also offer a sleek and modern design that complements any style. In this guide, we’ll walk you through the seamless installation process, breaking down each step to ensure a trouble-free experience. By understanding the intricacies of roof lantern installation, you’ll be well-equipped to transform your space with confidence and ease. So, let’s get started on this exciting journey to illuminate your home with the brilliance of Korniche Roof Lanterns.
Preparing for Installation
Before diving into the installation of your Korniche Roof Lantern, proper preparation is key. This section will guide you through the essential steps to ensure a smooth and efficient installation process.
Gathering Essential Tools
To install your Korniche Roof Lantern effectively, you’ll need the right tools at your disposal. Start by assembling a comprehensive toolkit that includes both standard and specialised equipment.
Begin with basic hand tools such as screwdrivers, wrenches, and a hammer. These will be crucial for various assembly tasks. Next, add measuring tools like a tape measure and spirit level to ensure precise alignments.
For cutting and fitting, include a saw and drill with appropriate bits. Don’t forget safety equipment such as gloves, safety glasses, and a hard hat. Lastly, gather specialist tools like suction cups for handling glass panels and a silicone gun for sealing.
Remember, having the right tools not only makes the job easier but also ensures a higher quality finish and safer installation process.
Understanding the Installation Guide
Familiarising yourself with the Korniche Roof Lantern installation guide is a crucial step in the preparation process. This comprehensive document provides detailed instructions and valuable insights for a successful installation.
Start by thoroughly reading the guide from start to finish. Pay close attention to the parts list, ensuring you have all necessary components before beginning. Take note of any specific measurements or tolerances mentioned.
Study the diagrams and illustrations carefully. These visual aids can often clarify complex steps or assembly procedures. If you encounter any unfamiliar terms or techniques, research them before proceeding with the installation.
Remember, the installation guide is your roadmap to success. Following it closely will help you avoid common pitfalls and ensure a smooth, efficient installation process.
Site Preparation Steps
Proper site preparation is essential for a successful Korniche Roof Lantern installation. Begin by clearing the work area of any obstacles or debris that could hinder your progress or pose safety risks.
Next, carefully measure and mark the installation area according to the specifications in your installation guide. Double-check these measurements to ensure accuracy. If you’re installing on an existing roof, inspect the structure for any damage or weak points that need addressing before proceeding.
Ensure you have a stable, level surface to work on. If necessary, create a temporary platform or scaffolding for safe access to the installation area. Lastly, cover any nearby furniture or fixtures to protect them from dust or accidental damage during the installation process.
By taking these preparatory steps, you’ll create an ideal environment for a smooth and efficient Korniche Roof Lantern installation.
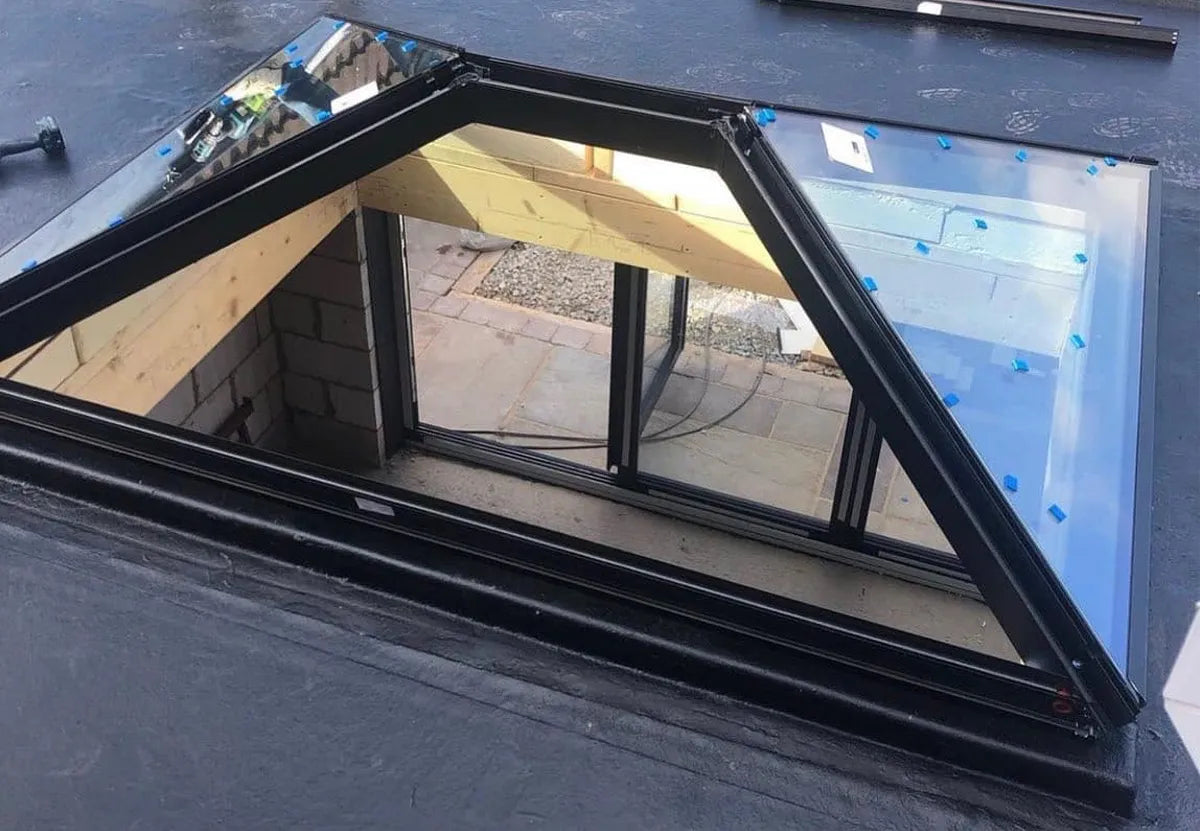
Installing the Frame
The frame is the foundation of your Korniche Roof Lantern, and proper installation is crucial for the overall stability and performance of the unit. This section will guide you through the key steps of frame installation.
Aligning the Frame Correctly
Correct alignment of the Korniche Roof Lantern frame is crucial for ensuring proper fit, functionality, and aesthetics. Begin by carefully positioning the frame components according to the installation guide.
Use a spirit level to check that the frame is perfectly level in all directions. This step is critical as even slight misalignments can lead to issues with glass fitting and water drainage. Take your time to make small adjustments until the frame is perfectly level.
Next, check the diagonals of the frame to ensure it’s square. Measure from corner to corner in both directions; these measurements should be equal. If they’re not, adjust the frame slightly until they match.
Remember, patience is key during this stage. Proper alignment at this point will save you time and potential issues later in the installation process.
Securing the Frame in Place
Once your Korniche Roof Lantern frame is correctly aligned, it’s time to secure it firmly in place. This step is crucial for ensuring the long-term stability and performance of your roof lantern.
Start by double-checking the alignment one last time before beginning to secure the frame. Once you’re satisfied, begin fastening the frame to the supporting structure using the fixings provided in your Korniche kit.
Work methodically around the frame, securing each point as specified in the installation guide. Be careful not to over-tighten the fixings, as this could distort the frame. Use a torque wrench if available to ensure consistent tightening.
After securing all points, perform a final check of the frame’s level and squareness. Make any necessary adjustments before moving on to the next stage of installation.
Fitting the Glass Panels
With the frame securely in place, it’s time to install the glass panels. This is a delicate process that requires careful handling and precise placement to ensure a perfect fit and optimal performance of your Korniche Roof Lantern.
Positioning Glass Panels Safely
Handling and positioning the glass panels for your Korniche Roof Lantern requires care and precision. Safety should be your top priority during this stage of the installation process.
Start by inspecting each glass panel for any damage or imperfections. Clean the panels thoroughly to ensure optimal visibility and performance. When lifting the panels, always use suction cups designed for glass handling to provide a secure grip and reduce the risk of dropping.
Position the panels one at a time, following the sequence outlined in your installation guide. Have a helper assist you in guiding each panel into place. Take care to align the edges correctly with the frame and adjacent panels.
Remember, patience is crucial during this step. Rushing can lead to misalignments or even broken glass, so take your time to ensure each panel is positioned correctly before moving on to the next.
Applying the Top Caps
Next, install the glazing bars and caps according to the guide. These components not only secure the glass in place but also contribute to the overall aesthetic of your roof lantern. Ensure each bar is correctly aligned and firmly seated.
Finally, wipe away any excess sealant for a clean finish. Allow the sealant to cure fully before exposing the roof lantern to water or extreme weather conditions.
Finalising the Installation
As you near the end of your Korniche Roof Lantern installation, attention to detail becomes even more critical. This section will guide you through the final steps to ensure a perfect finish and optimal performance.
Attaching Finishing Touches
The finishing touches on your Korniche Roof Lantern installation are what transform it from a functional structure to a stunning architectural feature. This stage is all about attention to detail and aesthetic refinement.
Start by installing any decorative trims or covers provided with your Korniche kit. These elements not only enhance the visual appeal but often serve functional purposes like concealing fixings or providing additional weatherproofing.
Next, carefully clean the entire structure, both inside and out. Remove any fingerprints, smudges, or construction debris from the glass and frame. This step is crucial for allowing the full beauty of your roof lantern to shine through.
Finally, apply any optional accessories such as blinds or shading systems if desired. These can add both functionality and a personalized touch to your installation.
Conducting a Thorough Inspection
A comprehensive final inspection is crucial to ensure your Korniche Roof Lantern is installed correctly and ready for years of trouble-free service. This step helps identify and address any minor issues before they become major problems.
Begin by visually inspecting the entire structure from both inside and outside. Look for any gaps, misalignments, or areas where the finish doesn’t meet your expectations. Pay special attention to the seals around each glass panel and the junction between the lantern and your existing roof.
Next, test all moving parts such as vents or opening mechanisms if your model includes these features. Ensure they operate smoothly and seal properly when closed.
Finally, wait for rainfall to check for any leaks or water ingress. If possible, observe the lantern during various weather conditions to ensure it performs as expected in all situations.
Common Challenges and Solutions
Even with careful preparation and execution, you may encounter some challenges during your Korniche Roof Lantern installation. This section addresses common issues and provides practical solutions to help you overcome them.
Troubleshooting Misalignments
Misalignments in your Korniche Roof Lantern installation can lead to various issues, from aesthetic concerns to functional problems. Identifying and correcting these misalignments is crucial for the longevity and performance of your roof lantern.
If you notice gaps between glass panels or uneven spacing in the frame, start by double-checking all measurements. Ensure that the supporting structure is level and square. Sometimes, small adjustments to the frame can resolve alignment issues.
For misaligned glazing bars, carefully loosen the fixings and adjust their position. Use a straight edge to ensure they’re perfectly aligned before re-tightening. If glass panels are sitting unevenly, check for debris in the frame channels and clean if necessary.
Remember, precision is key in roof lantern installation. Don’t hesitate to backtrack a few steps if needed to achieve perfect alignment. It’s better to invest time in corrections now than to deal with ongoing issues later.
Addressing Sealant Issues
Proper sealing is crucial for the weatherproofing and energy efficiency of your Korniche Roof Lantern. Addressing sealant issues promptly can prevent water ingress and other potential problems.
If you notice gaps in the sealant, first clean the area thoroughly to ensure good adhesion. Apply additional sealant using a caulking gun, taking care to achieve a smooth, continuous bead. For best results, use the sealant recommended in your Korniche installation guide.
In cases where the sealant isn’t curing properly, temperature might be the culprit. Ensure you’re working within the recommended temperature range for the sealant. If necessary, create a controlled environment around the installation area.
Lastly, if you’re experiencing persistent leaks despite proper sealing, consult the troubleshooting section of your installation guide. There might be an underlying issue with the installation that needs addressing.
Share:
The Ultimate Trade Partner’s Handbook: Elevating Home Improvements with Roof Lantern Skylights
Transform Your Home with an Orangery Design: The Ultimate Guide to Larger Roof Lanterns