Most people think fitting a Korniche roof lantern is too tricky for beginners. The truth is, with the right instructions, you can handle the installation yourself and bring fresh natural light into your home. This step by step guide will walk you through the Korniche roof lantern installation so you can boost your home improvement skills and enjoy a brighter space without calling in a pro.
Understanding Your Korniche Roof Lantern
Before you start your DIY roof lantern project, it's worth getting familiar with what makes Korniche products stand out. These aren't your average roof windows. Korniche roof lanterns are designed with a contemporary aluminium frame that's built to last, offering both style and substance for your home improvement plans.
The beauty of a korniche roof lantern is in its simplicity. You're looking at a product that's been engineered with the installer in mind. The components fit together logically, and the system's been refined over years of real-world testing. This means you're not wrestling with complicated parts or unclear instructions.
What's in the Box
When your Korniche roof lantern arrives, you'll find the aluminium roof lantern frame, glazing bars, ridge, eaves beam, and all the fixings you need. The glazing panels come separately, and they're typically toughened or laminated glass units that meet building regulations. Everything's packaged to protect the components during transit, so take your time unpacking and check each piece against the delivery note.
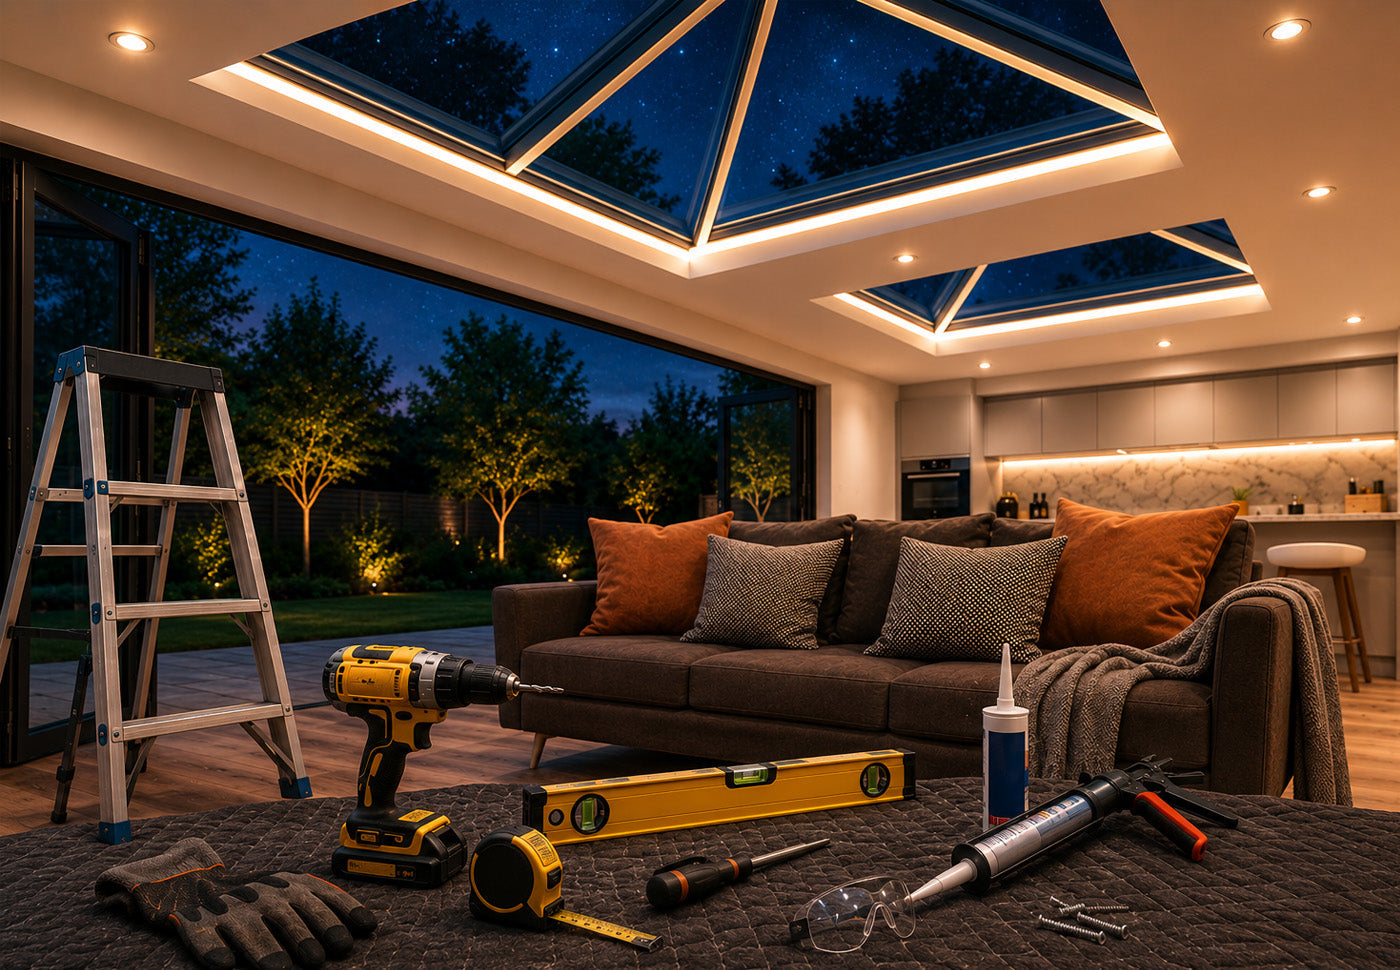
Tools You'll Need
Let's talk about the toolkit for this job. You won't need anything too specialised, which is good news for your wallet. A cordless drill with various drill bits, a spirit level, measuring tape, silicone sealant and gun, a saw (circular or hand saw depending on your preference), screwdrivers, and safety equipment like gloves and goggles will see you through. If you're working at height, proper scaffolding or a stable platform is non-negotiable for safety.
Preparing the Opening
The foundation of a successful Korniche roof lantern installation starts with proper preparation. You can't rush this bit. The opening in your roof needs to be accurate, square, and structurally sound. If you're converting an existing flat roof or creating a new opening, you'll need to work with the structural requirements of your building.
Measuring Up
Measure twice, cut once. That old saying exists for a reason. Your opening needs to match the external kerb dimensions of your korniche roof lantern. The kerb is what the lantern sits on, and it needs to be perfectly level and square. Use your spirit level religiously here. Even a slight deviation can cause problems down the line with water ingress or poor glazing fit.
Take diagonal measurements across the opening. If both diagonals are identical, your opening is square. If they're not, you'll need to make adjustments before proceeding. This isn't the time to convince yourself that "close enough" will do.
Building the Kerb
The kerb is your upstand, typically 150mm high, though this can vary based on your specific installation. You're building a frame that raises the roof lantern above the flat roof surface, which is crucial for weatherproofing. Use treated timber that can handle exterior conditions. A common approach is to use 150mm x 47mm treated timber, creating a box that matches your opening dimensions.
Fix the kerb securely to the roof joists or structural supports. You're not just tacking it down. This kerb needs to support the weight of the lantern and resist wind loads. Use appropriate fixings, typically coach screws or heavy-duty screws at regular intervals. The kerb's top surface should be perfectly level all the way around.
Weatherproofing the Kerb
Before the korniche roof lantern goes anywhere near the kerb, you need to weatherproof it properly. This is where your home improvement project lives or dies in terms of long-term performance. Apply a waterproof membrane or lead flashing to the kerb, ensuring it laps over the roof covering below and up the sides of the kerb.
The membrane should be dressed neatly into corners and fixed securely. Any wrinkles or gaps are potential leak points. If you're using lead, dress it carefully and fix it with lead tacks or clips. The goal is to create a continuous waterproof barrier that directs any water away from the interior.
Installing the Korniche Roof Lantern Frame
Right, you've got your opening prepared and your kerb is ready. Now comes the exciting part of this step by step guide where you actually fit the lantern frame. This is where you'll really appreciate the thought that's gone into the Korniche design.
Positioning the Frame
Get someone to help you with this. Roof lanterns aren't impossibly heavy, but they're awkward to handle alone, especially when you're working at height. Lift the frame onto the kerb carefully. Before you fix anything, check that it's sitting evenly all the way around with consistent gaps.
Place your spirit level across different points of the frame. It needs to be level in all directions. If it's not sitting right, don't force it. Come back down and check your kerb. The frame will only be as level as the surface it's sitting on.
Fixing the Frame
Korniche systems typically use a fixing flange that sits on top of the kerb. You'll be drilling through this flange into the kerb timber below. Start at one corner and work your way around, but don't fully tighten all the screws immediately. Get all the fixings in place first, then progressively tighten them in a sequence that keeps the frame square.
As you tighten, keep checking with your spirit level. If you notice the frame going out of level, back off the screws slightly and adjust. The fixing points should be at regular intervals, typically every 300-400mm around the perimeter. Check your specific installation instructions for the exact requirements.
Sealing the Frame to Kerb Joint
Once the frame is fixed, you need to seal the joint between the frame and the kerb. This is your secondary line of defence against water. Use a high-quality exterior-grade silicone sealant. Run a continuous bead around the entire perimeter where the frame meets the kerb.
Don't skimp on sealant. A proper bead that's tooled smooth will perform far better than a thin, broken line. Tool the sealant with a wet finger or a proper sealant tool to create a smooth, concave profile that sheds water effectively.
Fitting the Glazing Bars and Ridge
The Korniche system uses a clever bar-and-ridge design that creates that distinctive contemporary look whilst providing structural support for the glazing. This part of your DIY roof lantern project is quite satisfying because you'll see the lantern really taking shape.
Installing the Eaves and Ridge Beams
The eaves beam sits at the lower end of the lantern, and the ridge beam runs along the top. These components slot into the side frames and are secured with the fixings provided. Make sure they're fully home in their locations. You should feel them click or seat properly.
The ridge beam is particularly important because it's carrying the top of all your glazing bars. It needs to be perfectly straight and level. Once again, your spirit level is your best friend. Check along the length of the ridge and across it.
Positioning the Glazing Bars
Glazing bars run from the eaves beam up to the ridge. The spacing is predetermined by the Korniche design, which makes your life easier. These bars slot into place and are fixed according to the manufacturer's instructions. Each bar needs to be vertical and aligned properly.
As you fit each bar, check that it's sitting correctly at both ends. The bars have gaskets and seals that need to be in the right position to do their job. Don't force anything. If a bar isn't fitting easily, check that you've got it the right way round and that there's nothing obstructing its path.
Checking the Framework
Before you move on to glazing, walk around the lantern and check everything. All fixings should be tight, all bars should be vertical and evenly spaced, and the whole structure should feel solid. Give it a gentle shake (carefully, you're still on a roof). There shouldn't be any significant movement or rattling.
This is your last chance to make adjustments before the glass goes in. Once those glazing panels are installed, you don't want to be taking them out again to fix something you missed.
Installing the Glazing Panels
The glazing is what turns your frame into a functioning roof lantern that floods your space with natural lighting solutions. Korniche roof lanterns use high-performance glass units that are thermally efficient and safe. These panels are heavy and fragile, so you need to treat them with respect.
Handling the Glass Safely
Glass safety is non-negotiable. Wear gloves, safety glasses, and appropriate footwear. Always carry glass panels vertically, never flat. If you're working with a helper, communicate clearly about what you're doing. Most accidents happen because of miscommunication or rushing.
Use suction handles if you have them available. These make handling large glass panels much safer and easier. If you don't have suction handles, keep your grip firm and your movements slow and deliberate.
Fitting the Panels
The glazing panels sit on the glazing bars and are held in place by caps that clip over the bars. Start with one section and work systematically. Lower each panel carefully into position, ensuring it's sitting on the gaskets provided. The gaskets create the weatherproof seal and cushion the glass.
Each panel should sit evenly with consistent gaps all around. If a panel isn't sitting right, lift it out and check for obstructions or misaligned gaskets. Don't try to force a panel into place. The Korniche system is designed for panels to drop in easily when everything's aligned correctly.
Securing the Glazing Caps
Once a panel is in position, the glazing cap clips over the bar to hold it securely. These caps should click into place with firm hand pressure. You shouldn't need tools to fit them. Work along each bar, ensuring the caps are fully home along their entire length.
The caps not only hold the glass but also complete the weatherproofing system. Make sure they're seated properly with no gaps. Any gap is a potential leak point or a place where the cap could come loose in high winds.
Sealing and Weatherproofing
You've got your korniche roof lantern installed, but you're not finished yet. Proper sealing is what separates a professional-looking installation from a DIY disaster. This is where attention to detail really counts in your home improvement project.
Internal Sealing
Inside, where the lantern frame meets your ceiling, you'll need to seal and trim. This creates a neat finish and prevents draughts. Use a suitable sealant around the perimeter, then cover with trim or plaster as appropriate for your interior finish.
If you're plastering, use angle bead to create a clean line between the wall and the lantern frame. If you're using trim, choose something that complements your interior style. The goal is to make the installation look like it was always meant to be there.
External Weatherproofing
Outside, check all the joints and seals. Any gaps between the flashing and the roof covering should be sealed. The joint between the kerb and the roof surface is particularly important. This should already be weatherproofed with your membrane or lead work, but check for any areas that might need additional sealant.
Look at how water will run off the lantern and away from the building. You don't want water pooling anywhere or running back towards the building. The whole installation should shed water effectively.
Testing for Leaks
Before you consider the job done, test for leaks. A gentle hose test can reveal problems that might not show up until the first heavy rain. Have someone inside watching for any water ingress whilst you carefully spray water over the lantern from outside.
Start at the bottom and work up, spending time on each area. If you find a leak, mark the location and fix it before moving on. It's far better to find and fix leaks now than to discover them during a storm.
Final Checks and Adjustments
You're nearly there. Your DIY roof lantern is installed, sealed, and tested. Now it's time for the final checks that separate a good installation from a great one.
Cleaning the Glazing
The glass has probably got fingerprints, sealant smears, and general installation grime on it. Clean it properly with a suitable glass cleaner. This is when you'll really see the difference your natural lighting solutions make to the space below.
Clean both inside and out. Use a non-abrasive cloth and work methodically to avoid streaks. Stand back and check for any marks you've missed. The glass should be crystal clear, letting in maximum light.
Checking All Fixings
Go around one more time and check every fixing. Make sure screws are tight, caps are fully seated, and nothing's come loose during the installation process. This final check takes ten minutes but can save you from callbacks or problems down the line.
Documenting Your Work
Take photos of the completed installation, both inside and out. These are useful for your records and can help if you ever need to reference how something was done. Keep all the installation instructions, warranties, and product information together in a safe place.
Building Regulations and Compliance
Let's talk about the legal side of your Korniche roof lantern installation. This isn't the most exciting part of home improvement, but it's important. In most cases, installing a roof lantern requires building regulations approval.
What You Need to Know
Building regulations cover structural integrity, thermal performance, ventilation, and safe glazing. Your korniche roof lantern needs to meet specific U-values for thermal performance. The glass needs to be safety glass in roof applications. The structure needs to be adequately supported.
If you're doing this as a DIY project, you're responsible for ensuring compliance. That means either working with your local building control or using a competent person scheme installer. Don't skip this step. Non-compliant work can affect your home insurance and cause problems when you sell.
Getting Sign-Off
Once your installation is complete, building control will need to inspect and approve the work. They'll check that the installation meets regulations and issue a completion certificate. Keep this certificate with your property documents. Future buyers will want to see it.
Maintenance and Care
Your Korniche roof lantern installation is complete, but like any part of your home, it needs some care to perform well over the years. The good news is that maintenance is straightforward.
Regular Cleaning
Clean the glass at least twice a year, more if you're in an area with lots of trees or pollution. Use a soft cloth and appropriate cleaner. Avoid abrasive materials that could scratch the glass or damage the frame finish.
Clean the frame and glazing bars at the same time. Dirt and debris can accumulate in the joints and channels. A soft brush and soapy water will shift most grime. Rinse thoroughly and dry with a clean cloth.
Checking Seals and Drainage
Once a year, check the seals around the glazing and frame. Look for any signs of deterioration or gaps. Check that drainage channels are clear and water can flow freely. Blocked drainage can lead to water backing up and potentially leaking into your home.
If you spot any issues, address them promptly. A small problem caught early is much easier to fix than major water damage discovered too late.
Long-Term Performance
With proper installation and regular maintenance, your korniche roof lantern should give you decades of trouble-free service. The aluminium frame won't rot or warp like timber. The glass units are built to last. You've created a feature that will enhance your home's value and your quality of life.
Troubleshooting Common Issues
Even with careful installation, you might encounter some issues. Here's how to address the most common problems with your DIY roof lantern project.
Condensation
A bit of condensation on cold mornings is normal and not a sign of a problem. Excessive condensation, particularly between the glass panes, indicates a failed sealed unit that needs replacing. Surface condensation usually means your home needs better ventilation.
Minor Leaks
If you get a leak, don't panic. Trace it back to its source, which isn't always where the water appears inside. Check all the seals and joints in that area. Often, a small application of additional sealant will solve the problem.
Draughts
Draughts around the frame usually indicate a gap in the internal sealing. Check where the frame meets the ceiling and add sealant or adjust trim as needed. The lantern itself should be draught-free if installed correctly.
The Benefits You'll Enjoy
Now that your Korniche roof lantern installation is complete, let's reflect on what you've achieved. You've taken on a significant home improvement project and succeeded. The natural lighting solutions you've installed will transform your living space.
More Natural Light
The most obvious benefit is the flood of natural light. Rooms that were previously dim and uninviting are now bright and welcoming. Natural light improves mood, reduces energy costs, and makes spaces feel larger.
Increased Property Value
A well-installed roof lantern adds value to your property. It's a desirable feature that appeals to buyers. You've not just improved your own enjoyment of your home but also made a sound investment.
Personal Achievement
There's genuine satisfaction in completing a project like this yourself. You've learned new skills, saved money on installation costs, and created something that will benefit your home for years to come. That's worth celebrating.
Working with Trade Partners
If you're in the glazing industry or work as a home improvement professional, the Korniche roof lantern represents an excellent product to offer clients. The installation process we've covered here shows why these units are popular with both installers and homeowners.
The system's been designed with installation in mind. Components fit together logically, the instructions are clear, and the finished result looks professional every time. For trade partners, this means faster installation times and fewer callbacks.
When you're specifying natural lighting solutions for clients, Korniche products offer the combination of quality, aesthetics, and value that keeps customers happy. They're backed by solid warranties and technical support when you need it.
Moving Forward with Confidence
You've now got a comprehensive understanding of the Korniche roof lantern installation process. Whether you're a homeowner tackling your first DIY roof lantern or a professional looking to refine your approach, this step by step guide has covered everything you need to know.
The key to success is preparation, attention to detail, and not rushing the process. Take your time, follow the instructions, and don't be afraid to ask for help when you need it. The glazing industry has excellent technical support available, and most manufacturers are happy to answer questions.
Your home improvement journey doesn't end with this installation. You've gained skills and confidence that you can apply to future projects. Each successful project builds your capabilities and opens up new possibilities for enhancing your home.
The natural light streaming through your new korniche roof lantern is a daily reminder of what you can achieve. It's proof that with the right guidance and a willingness to learn, you can tackle projects that might have seemed beyond your abilities. That's the true value of DIY home improvement.
For more detailed visual guidance on the installation process, watch this comprehensive installation video. You can also find additional installation tips and technical details that complement this guide.
Share:
A Trusted Guide to Enhancing Your Home's Style and Lighting with Roof Lanterns and Modern Door Options